How to Install an Electric Bidet Seat (Step-by-Step Guide 2026)
⚡ Quick Answer
Electric bidet seat installation takes 20 to 35 minutes and requires no plumber. You need a flat-head screwdriver, adjustable wrench, and a GFCI outlet within 4 feet. The process is: remove old seat, mount bidet seat mounting plate, connect T-valve to water supply, attach supply hose, slide seat onto plate, plug in. This guide covers every step for the Brondell Swash 1400, TOTO Washlet C5, and Bio Bidet Bliss BB-2000.
💧 BidetLabs Testing Note
The BidetLabs team has installed and uninstalled every major electric bidet seat on the market. This guide reflects what actually happens in a real bathroom, including the steps that instruction manuals gloss over.
Your new electric bidet seat just arrived. The box contains the seat, a mounting plate, a T-valve, a flexible supply hose, some hardware, and a manual that makes a 30-minute job look complicated. Here is the process simplified, tested, and explained in plain language by the BidetLabs team.
What You Need Before You Start
Tools Required
- ✓Flat-head screwdriver
- ✓Adjustable wrench or pliers
- ✓Small bucket or towels
- ✓Measuring tape (optional)
What Comes in the Box
- ✓Electric bidet seat
- ✓Mounting plate and hardware
- ✓T-valve (brass or plastic)
- ✓Flexible supply hose
⚠️ Critical Before You Start
You must have a GFCI (Ground Fault Circuit Interrupter) electrical outlet within 4 feet of the toilet. This is a standard code requirement for bathroom outlets. If the outlet near your toilet is not GFCI, do not plug in the seat until an electrician installs one. Extension cords are not safe or code-compliant for bidet seats.
Step-by-Step: Electric Bidet Seat Installation
Turn Off the Water Supply
Locate the water shutoff valve on the wall behind and to the left of your toilet (when facing it). Turn the oval handle clockwise until it stops. Flush the toilet once to empty the tank and relieve water pressure in the supply line. Place a small bucket or several towels under the valve connection. There will be residual water in the supply hose when you disconnect it.
Remove the Existing Toilet Seat
Locate the plastic bolt caps at the back of the toilet seat (one on each side). Pop them open with a flat-head screwdriver. Inside you will see either a plastic wing nut (hand-tighten only) or a standard nut. Hold the bolt from the top with your screwdriver while unscrewing the nut underneath. On many seats, the nut is made of plastic and you can turn it by hand. Lift the seat off the bolt holes and set it aside. Keep the bolts for a moment as you will need to check if the bidet's mounting hardware reuses them or replaces them.
Mount the Bidet Mounting Plate
Electric bidet seats do not bolt directly to the toilet. Instead, a separate plastic mounting plate installs first, and the seat slides and locks onto it. Position the mounting plate over the bolt holes. Thread the provided bolts up through the holes from beneath (or drop them through from the top, depending on the brand). Tighten the provided nuts. Do not overtighten on porcelain. Hand-tight plus a quarter turn with a wrench is sufficient. The plate should not rotate when pushed side to side. The BidetLabs team found that Brondell's plate design is the most intuitive; TOTO's requires slightly more positioning care to align the plate in the center.
Install the T-Valve on the Water Supply Line
Disconnect the existing supply hose from the bottom of the toilet tank (the hose running from the wall valve up into the tank). This is the step where the residual water will drip out. Have your bucket ready. Now screw the T-valve adapter onto the water supply valve on the wall. Hand-tighten, then snug it with the wrench (about one full turn). Reconnect your existing supply hose to the top outlet of the T-valve. Connect the bidet's dedicated supply hose to the side outlet of the T-valve. Route this hose toward the seat's inlet connection. Bidet supply hoses are typically 18 to 24 inches and should not need to be stretched or bent sharply.
Slide the Bidet Seat onto the Mounting Plate
Connect the supply hose to the inlet port on the underside of the bidet seat (typically on the left side near the back). Tighten hand-tight only; plastic threads strip easily. Now align the seat's mounting slots with the mounting plate tabs. Lower the seat onto the plate and slide it forward until you hear or feel a click. Give the seat a firm forward push to confirm it is locked. Most bidet seats have a release button or tab at the back of the seat that you press to slide it off again. Test this a couple of times so you understand how it works before calling the installation complete.
Restore Water and Check for Leaks
Turn the wall shutoff valve slowly counterclockwise to restore water. Watch all three connection points simultaneously: the valve-to-T-valve joint, the T-valve-to-toilet-tank joint, and the T-valve-to-bidet-hose joint. Also watch the hose-to-seat connection at the back of the bidet. If any joint weeps water, turn off the supply, disconnect, wrap the threads with two to three layers of plumber's tape (Teflon tape), and reconnect. Let water run for 30 seconds and check again. The BidetLabs team found that plumber's tape at every threaded joint prevents nearly all drip issues on first install.
Plug In and Test
Plug the bidet's power cord into the GFCI outlet. Wait 60 seconds for the system to initialize. Most electric bidet seats display a small indicator light or produce a startup chime. Press the rear wash button on the remote or side panel. The nozzle should extend and a water stream should appear. Test the heated seat by sitting on it for 30 seconds and confirming warmth. Test the warm water wash: the first few seconds will be cold (the heater needs a moment), then warm water should arrive. On tankless systems like the Brondell Swash 1400, warm water arrives within 3 to 5 seconds. On tank-style heaters, it arrives immediately but may cool off after 30 to 60 seconds of continuous use.
💡 Pro Tip: Hose Routing
Use the wire tie or clip included in most bidet boxes to secure the supply hose to the existing toilet supply hose. This keeps both hoses from dangling loose under the tank and prevents them from kinking or catching when the toilet is cleaned.
Our Recommended Electric Bidet Seats
This guide applies to all major electric bidet seats. Here are the three we recommend based on ease of installation and performance:
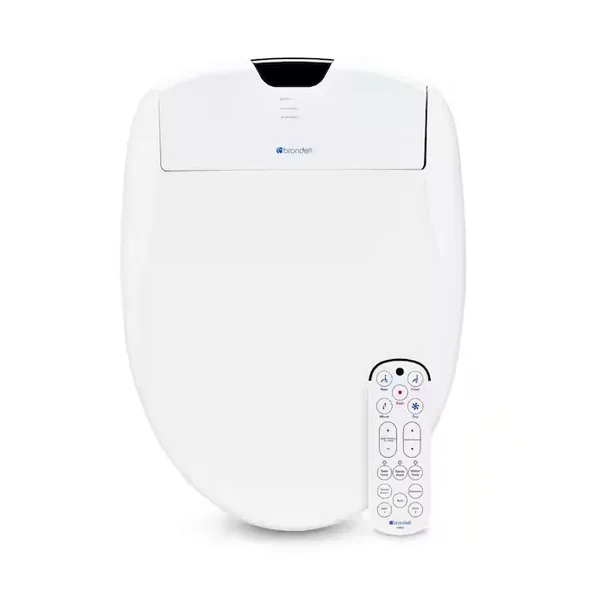
Brondell Swash 1400
The Brondell Swash 1400 has the clearest installation manual the BidetLabs team has encountered. The mounting plate snaps into position easily, the supply hose is long enough to reach without strain, and the side-panel controls mean you are using the seat within seconds of plugging it in. Unlimited warm water via the on-demand heating system is the feature that makes this worth the premium price.
- +Clearest installation guide in our testing
- +Unlimited warm water, heated seat, air dryer
- +Oscillating stainless steel nozzle
- +3-year warranty, US customer service
- -Premium price
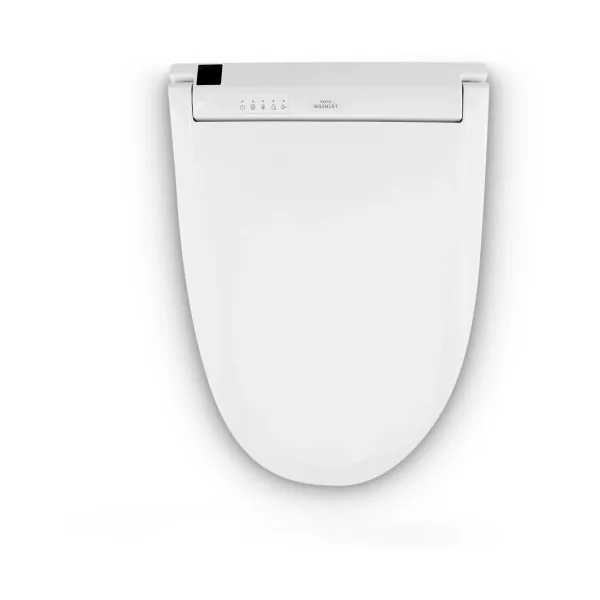
TOTO Washlet C5
TOTO's installation process is clean and logical, and the C5 includes a wand-style remote that clips to your toilet paper holder. The ewater+ electrolyzed water self-cleaning system is unique to TOTO and genuinely effective. The BidetLabs team clocked C5 installation at 28 minutes, and that included reading the manual once through before starting. Available in round and elongated bowl sizes.
- +ewater+ electrolyzed water nozzle cleaning
- +Heated seat, warm water, air dryer
- +Auto-open lid, remote wand included
- +Available in round and elongated
- -Slightly more complex mounting alignment
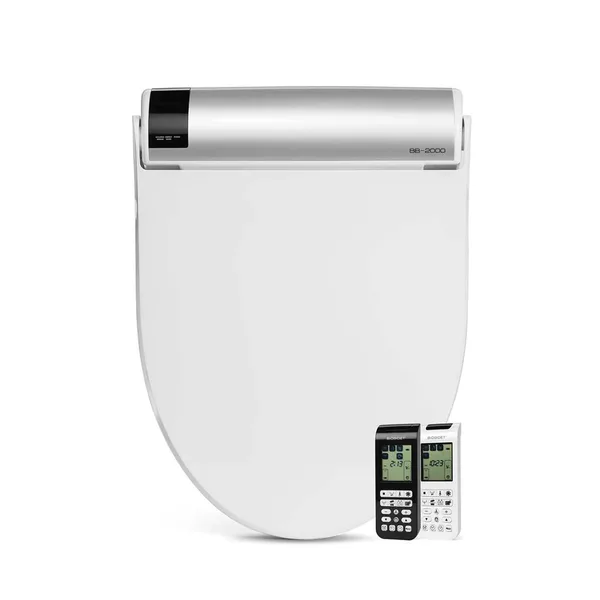
Bio Bidet Bliss BB-2000
The Bio Bidet Bliss BB-2000 includes a bubble infusion wash that aerates the water stream for a gentler clean, and a stainless steel nozzle at this price point is unusual. Installation follows the same process as this guide. The side panel plus remote combo means every member of the household can find a control method that works for them. One note: the side panel mounts to the seat body and requires routing the remote holder to the wall or toilet paper holder as a separate step.
- +Stainless steel nozzle with bubble infusion wash
- +Both side panel and wireless remote included
- +Heated seat, warm water, air dryer
- +Night light, deodorizer
- -Remote holder mounting adds one extra step
Not Ready for Electric?
If your bathroom has no outlet near the toilet, start with the TUSHY Classic 3.0 (no electricity required, installs in 15 minutes) or the TUSHY Spa 3.0 (warm water from your sink line, also no electricity). Both are excellent bidets that install without any electrical work.
Troubleshooting Common Install Issues
Slow drip at the T-valve: Turn off the supply, disconnect the fitting, wrap with 3 to 4 layers of plumber's tape, reassemble. This fixes 95% of drip issues on first install. The BidetLabs team keeps a roll of plumber's tape next to every install kit.
Seat slides sideways on the mounting plate: The mounting plate was likely not centered over the bolt holes. Loosen the bolts, reposition the plate so it sits symmetrically (equal distance from each bolt hole), and retighten. The seat should not be able to slide more than a few millimeters in any direction when properly locked.
Warm water never arrives: Confirm the power cord is fully seated in the outlet. Check that the seat's water inlet connection is hand-tight (loose connections allow air into the line). If the seat uses a tank heater (not an on-demand system), allow 5 minutes for the tank to heat before testing warm water.
Nozzle sprays to the side: The mounting plate may need to be rotated slightly. Electric bidet seats often include a plate adjustment screw that allows left-right rotation. Adjust in small increments and test until the stream is centered. On the Brondell Swash SE400, nozzle position can also be adjusted in the settings menu, which is faster than physically adjusting the plate.
Ready to install? Start with the best.
The Brondell Swash 1400 has the clearest install process, unlimited warm water, and a 3-year warranty. It is the last bidet you will ever buy.
Shop Brondell Swash 1400 on AmazonFrequently Asked Questions
Do I need a plumber to install an electric bidet seat?
No. Electric bidet seat installation is DIY-friendly and takes 20 to 35 minutes for most people. You need a flat-head screwdriver, adjustable wrench, and a bucket. The only requirement beyond that is an electrical outlet within 4 feet of the toilet. If no outlet exists, consult an electrician for that step only.
What if there is no electrical outlet near my toilet?
An electrical outlet is required for all electric bidet seats. If none exists, you have two options: hire an electrician to install a GFCI outlet (typically $150 to $300), or choose a non-electric bidet attachment like the TUSHY Classic 3.0 that requires no power. Do not use an extension cord for an electric bidet seat.
How long does it take to install an electric bidet seat?
Most people complete the installation in 20 to 35 minutes on their first attempt. The BidetLabs team timed a Brondell Swash 1400 installation at 22 minutes from box open to first use. The TOTO Washlet C5 took 28 minutes. The extra time over a non-electric attachment comes from the T-valve adapter and hose management.
Can I install an electric bidet seat if I rent my apartment?
Yes. Installation is fully reversible. You remove the existing toilet seat, install the bidet seat using the same bolt holes, and connect a T-valve to the existing water supply line. When you move out, reverse those steps, reinstall the original seat, and the toilet looks exactly as it did before. No drilling, no permanent changes.
Which electric bidet seat is easiest to install?
The Brondell Swash 1400 has the clearest installation guide in the BidetLabs team's testing. The TOTO Washlet C5 is also straightforward. The Bio Bidet Bliss BB-2000 takes slightly longer due to the remote holder mounting. All three follow the same general process outlined in this guide.